Waterline ceramic tile sits in the toughest microclimate of the pool. It lives half in water, half in sunlight, with consistent wetting and drying, chemical exposure, and movement from the covering and surrounding deck. When a waterline installation fails, it virtually never ever starts with the ceramic tile itself. The offender is virtually always the substratum and the ceramic tile underlayment.
I have actually seen perfect ceramic tiles set up with costs thinset shear off in sheets because the swimming pool bond beam was chalky, not really prepared, or cracked. I have also seen easy porcelain strips last 25 years on an old shotcrete pool due to the fact that the installer took the time to appropriately scarify, water-proof, and float the beam.
If you desire waterline tile that matches that 2nd outcome, you need to treat the underlayment as a full system, not a skim coat afterthought.
Why waterline installments fail
When a waterline band begins to pop or hollow out, the signs and symptoms appear at the ceramic tile, but the illness is deeper. Many failures trace back to a familiar group of reasons:
The bond beam might be soft, contaminated, or never ever properly keyed to get floor tile. I commonly see smooth pneumatically applied concrete without any actual mechanical tooth left after years of plaster and calcium. Also an excellent mortar bed will certainly not remain connected to a slick or dusty surface.
Deck movement transfers right into the floor tile. The joint between dealing rocks, bullnose brick, or cantilevered coping and the pool covering is a high‑movement zone. If the mastic joint is brittle or absent, emphasizes traveling straight right into the ceramic tile underlayment.
Moisture behind the floor tile underlayment damages the bond over time. This can be from a broken skimmer throat, leaking swimming pool light niches, poor waterproofing, or missing sealant at penetration factors. Water sneaks behind the ceramic tile, then stress, freeze‑thaw, and salt or mineral accumulation gradually press it off.
Chemical assault and surface area over‑etching from solid acid job can damage the substrate. A hostile muriatic acid laundry, repetitive acid etching, or negligent prep for a new Quartz aggregate finish or subjected pebble surface can all harm the bond light beam face.
Poor outlining around shifts. Where waterline ceramic tile fulfills Hydrazzo, Diamond Brite, PebbleTec, or various other plaster and accumulation surfaces, the geometry and series matter. If the plaster staff damages the floor tile or the floor tile layer leaves weak edges, you get very early plaster delamination or chipping that leaves tile unsupported.
Understanding just how these items interact is the beginning factor for clever underlayment choices.
Start with the structure: assessing the swimming pool bond beam
Everything starts at the bond beam of light. If you are working with an older pool, presume absolutely nothing. I always begin by literally sounding the light beam and aesthetically evaluating prior to I think of ceramic tile underlayment.
Tap along the waterline with a hammer and pay attention for hollow or drummy locations. If you listen to gaps, you might require localized shotcrete repair work or gunite resurfacing to restore structural honesty. Hairline cracks with no activity can usually be linked with a suitable waterproofing membrane and versatile thinset, but active cracks sometimes call for eliminating and reconstructing a section, then linking back into audio concrete.
Check just how the original covering was built. A pneumatically applied concrete swimming pool can be very dense, yet I still see poorly compacted or rebound‑rich bond beam of lights on older jobs. If the surface area collapses when you scratch it with a screwdriver, or you can easily gouge it, you have to get rid of the weak material and rebuild that face, not just skim over it.
Do not avoid a swimming pool plumbing stress test when you are doing significant waterline or bond light beam job. Concealed leakages that dispose water behind the shell will weaken your underlayment no matter how very carefully you trowel. If you have uncertainties concerning dirt movement or voids, stress screening plus a fundamental leak detection protocol is low-cost insurance contrasted to renovating the ceramic tile band.
Proper pool shell preparation and substrate scarification
Once the concrete is validated audio, you relocate right into shell prep work. This is where I see the most significant quality space between ordinary and excellent installations.
The surface have to be tidy, solid, and textured. That means old thinset, paint, loose plaster, and any soft places need to go. Mechanically getting rid of material is far more dependable than depending on acid alone. Good substrate scarification creates a visible mechanical secret: you desire the bond beam face to look open‑grained, not consistently smooth.
Grinders with ruby mugs, needle scalers, or bush hammers all have their location. On a complete remodel, I usually have the crew chip the whole waterline band down to bare, harsh concrete. The objective is not cosmetic; it is bond strength. Any kind of dense plaster or white line plaster residue, particularly where a previous tile band was hidden under a troweled walk, should be removed.
Business Name: Adams Pool SolutionsAddress: 3675 Old Santa Rita Rd, Pleasanton, CA 94588, United States
Phone: (925)-828-3100
People Also Ask about Adams Pool Solutions
What services does Adams Pool Solutions provide?
Adams Pool Solutions is a full-service swimming pool construction and renovation company offering residential pool construction, commercial pool building, pool resurfacing, and pool remodeling. Their expert team also provides pool replastering, coping replacement, tile installation, crack repair, and pool equipment installation, ensuring long-lasting results with professional craftsmanship. Learn more at https://adamspools.com/.
Where does Adams Pool Solutions operate?
Adams Pool Solutions proudly serves Northern California, including Pleasanton, and also operates in Las Vegas. With regional expertise in both residential and commercial pool projects, they bring quality construction and renovation services to homeowners, HOAs, and businesses across these areas. Find them on Google Maps.
Does Adams Pool Solutions handle commercial pool projects?
Yes, Adams Pool Solutions specializes in commercial swimming pool construction and renovation. Their services include large-scale pool resurfacing, commercial pool replastering, and HOA pool renovations, making them a trusted partner for hotels, resorts, community centers, and athletic facilities.
Why choose Adams Pool Solutions for pool renovation?
Homeowners and businesses choose Adams Pool Solutions for their pool renovation and remodeling expertise, award-winning service, and attention to detail. Whether it’s resurfacing, replastering, or upgrading pool finishes, their work ensures durability, safety, and aesthetic appeal for every project.
What awards has Adams Pool Solutions received?
Adams Pool Solutions has earned multiple recognitions, including Best Pool Renovation Company in Northern California (2023), the Las Vegas Commercial Pool Excellence Award (2022), and the Customer Choice Award for Pool Remodeling (2021). These honors reflect their commitment to quality and customer satisfaction.
What are the benefits of working with Adams Pool Solutions?
Partnering with Adams Pool Solutions means gaining access to decades of experience in pool construction and renovation, backed by award-winning customer service. Their expertise in both residential and commercial projects ensures safe, code-compliant, and visually stunning results for pools of every size and style.
How can I contact Adams Pool Solutions?
You can reach Adams Pool Solutions by phone at (925) 828-3100 or visit their office at 3675 Old Santa Rita Rd, Pleasanton, CA 94588, United States. Their business hours are Monday to Friday, 8 AM to 4 PM. More details are available at https://adamspools.com/.
Is Adams Pool Solutions active on social media?
Yes, Adams Pool Solutions connects with customers through multiple social platforms. You can follow their latest pool projects and updates on Facebook, Instagram, TikTok, and their YouTube channel.
HF acid or a muriatic acid laundry can help open up the surface area, yet it is a supplement, not the major preparation approach. Over‑etching can soften the top of the concrete, which is specifically what you do not want under tile. Wash extensively, reduce the effects of, and allow the area completely dry prior to continuing.
Repairing issues before you construct underlayment
Cracks, infiltrations, and spaces need to be dealt with as architectural repair work, not as aesthetic patching. Floor tile underlayment is not a gap filler for significant defects.
Hydraulic concrete works around active weepers and little penetrations where you need a quick collection. I utilize it in light particular niches, around tiny avenue entrances, and in specific skimmer throat repair circumstances where water is leaking and you can not completely dry the area. It is not an alternative to an appropriate concrete spot at the bond light beam face.
Light niches deserve different attention. Examine the specific niche border for gaps, unbonded material, and fractured plaster. Lots of specific niche leakages start at the user interface between steel or plastic and concrete. Clean back to solid product and rebuild with a dense repair work mortar, then integrate the particular niche perimeter right into your waterproofing layer.
Skimmer throat repair service is an additional weak spot. The throats usually have hairline fractures, falling short old patchwork, or dissimilar products from previous fast repair services. I prefer to eliminate all loosened or suspect material, restore the throat with suitable repair service mortar, tie it right into both the covering and the deck, and afterwards lap waterproofing membrane into the throat prior to tiling. A patched skimmer throat that still leakages will certainly mess up an otherwise stunning waterline installation.
Choosing the right floor tile underlayment system
Underlayment sits in between the swimming pool covering and your tile. In a normal waterline band, it has 3 work: squash the substratum, supply a strong mechanical and chemical bond, and collaborate with your waterproofing system instead of versus it.
A robust installation usually has this stack: prepared concrete bond light beam, optional patching or shotcrete repair, waterproofing membrane layer, mortar bed or progressing layer, after that thinset and tile.
The mortar bed or float layer for waterline tile is typically thinner than a full deck mud installation, yet it still requires strength and correct mix style. Utilizing the same loose, sandy mix that could glide in a shower pan is an error right here. Swimming pools see continuous submersion, temperature level swings, and dynamic filling from water and nearby structures.
Polymer changed underlayment mortars made for submerged use perform much better than generic stucco blends. They bond more tenaciously to the scarified shell and to the waterproofing membrane layer, and they withstand microcracking from shrinkage.
For glass mosaic ceramic tile specifically, the underlayment has to be dead level and suitable with a versatile adhesive. Glass relocates more with temperature adjustments than porcelain, and reflective defects reveal every abnormality. I such as a greater efficiency, polymer‑modified leveling coat in glass applications, adhered to by a thinset suggested by the tile and membrane makers for submerged glass.
The function of waterproofing membranes behind waterline tile
The disagreement regarding whether a waterline band requires a waterproofing membrane still surfaces on jobsites. My experience is candid: if you desire a long‑lasting setup, consist of a properly picked waterproofing membrane.
The waterline is the shift area between pool water and air, however much more importantly, it often rests over splits and joints in the bond beam. A good membrane aids decouple small activity, isolate hairline splits, and protect against moisture seepage from the back side.
Use items especially rated for constant water immersion, compatible with your chosen floor tile thinset, and acceptable under your neighborhood code and supplier service warranty. Some installers choose liquid‑applied membranes, others lean on sheet membrane layers. Both can work when detailed correctly.
Key points with membrane layers:
Terminations must be clear and purposeful. Where the membrane fulfills the bottom of travertine coping, bullnose brick, or a cantilevered coping, you ought to have a tidy break and a defined sealer or activity joint. Do not just smear product up behind the coping and hope.
Treat cracks deliberately. If there is an architectural split in the bond beam of light, treat it as a movement joint within the membrane layer system. Lots of sheet membranes supply crack isolation bands. Use them according to the producer's detail drawings.
Bridge penetrations very carefully. Around pool light niches, returns, and skimmers, you need to either make use of preformed collars or carefully reduced and bond the membrane to avoid pinholes or slim places. I commonly backfill tight corners with suitable sealant prior to applying membrane.
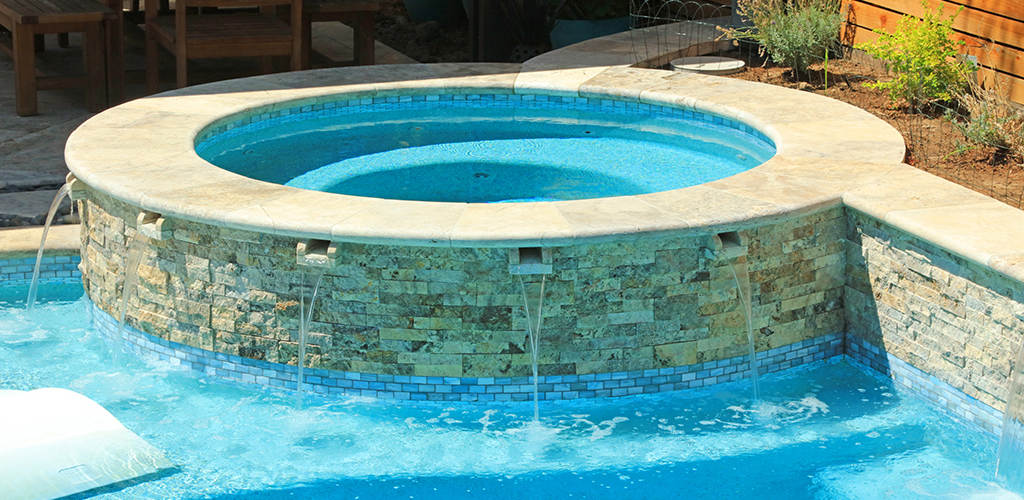
Integrating tile underlayment with dealing systems
The user interface between coping and the waterline band is where motion concentrates. It is additionally where numerous failings start, since this information can be fussy and simple to rush.
With travertine coping, the stone itself often has variable density and even more porosity. If the coping is already in place, inspect the bottom and face where the rock looms the waterline. Any type of drummy or loosened travertine should be reset prior to you deal with the ceramic tile. The underlayment needs to rise to satisfy the underside of the coping, leaving a deliberate joint to approve Deck‑O‑Seal or a comparable flexible sealant. Do not grout this joint strictly; it is your movement relief.
Bullnose brick dealing acts differently. Bricks expand and contract with wetness and temperature level, and the mortar joints in between them can break. Once more, create a specified joint in between block and waterline tile, and keep that joint flexible. On older pools, I typically see breakable or missing mastic. A thoughtful mastic joint replacement, with correct joint cleaning and backer pole, can drastically minimize stress and anxiety on your ceramic tile band.
Cantilevered coping, where the deck looms the swimming pool shell, moves the movement zone slightly outward. When you are resurfacing such a swimming pool, take notice of the joint in between the brand-new or existing deck and the bond beam of light. A missing out on or bridged development joint above will certainly telegram cracking right into your underlayment and ceramic tile. I have seen numerous cantilevered coping sections where the waterline tile showed a vertical crack every 6 to 8 feet, perfectly aligned with the pool tile installation lacking deck joint above.
Underlayment and interior surfaces: just how they interact
Pools hardly ever obtain floor tile work in isolation. Lots of remodels pair waterline ceramic tile with a brand-new inside, typically a Quartz accumulation surface, a Hydrazzo polished surface, Ruby Brite, or a PebbleTec or other exposed stone finish.
The sequence matters. If the plaster team can be found in before your floor tile is fully cured and protected, you take the chance of damages from hoses, tools, and hostile acid work. I choose to obtain the waterline ceramic tile and underlayment total, allow it cure appropriately, and afterwards set up the indoor finish.
Pay interest to exactly how the underlayment thickness associate the intended surface density. Hydrazzo and comparable items are usually somewhat thinner and firmly shovelled, while PebbleTec and various other revealed pebble finishes can vary more in thickness. I typically aim for the completed plaster to tuck neatly under the bottom of the waterline floor tile by a quarter to half an inch. The underlayment should suit that plane, so you do not end up with a lip or a ledge.
White line plaster, where a white band is purposefully left at the waterline along with tile or coping, requires much more intentional design. The underlayment for tile need to not crowd right into the area meant for the white band. If the white line is added later on as a cosmetic touch over an inadequately intended substratum, you can see very early breaking and plaster delamination right at the interface in between the finish and the tile.
Aggressive acid etching during start‑up can undercut a fresh underlayment if the plaster staff floodings acids up the wall and onto the tile. Coordinate with the startup professional and insist on managed, watered down use acids, not arbitrary dumps. Solid muriatic acid cleans can debond slim edges at the end of the underlayment where it meets brand-new plaster.
Adams Pools proudly serves businesses along Market Street with custom commercial pool construction solutions.
Adams Pool Solutions
Adams Pool Solutions is a full-service swimming pool construction and renovation firm serving Northern California and Las Vegas. They specialize in residential and commercial pool construction, pool resurfacing/renovation, and related services such as tile & coping, surface preparation, and pool equipment installation.
(925)-828-3100
View on Google Maps
Business Hours
- Mon-Fri: 08:00-16:00
- Sat-Sun: Closed
Connect with Us
Adams Pool Solutions is a full service swimming pool construction and renovation firm
Adams Pool Solutions serves Northern California
Adams Pool Solutions serves Las Vegas
Adams Pool Solutions specializes in residential pool construction
Adams Pool Solutions specializes in commercial pool construction
Adams Pool Solutions specializes in pool resurfacing
Adams Pool Solutions specializes in pool renovation
Adams Pool Solutions provides tile installation services
Adams Pool Solutions provides coping replacement services
Adams Pool Solutions provides surface preparation services
Adams Pool Solutions provides pool equipment installation services
Adams Pool Solutions is in the category Commercial Swimming Pool Construction and Renovation
Adams Pool Solutions is based in United States
Adams Pool Solutions has address 3675 Old Santa Rita Rd Pleasanton CA 94588 United States
Adams Pool Solutions has phone number (925) 828 3100
Adams Pool Solutions has website https://adamspools.com/
Adams Pool Solutions has opening hours Monday to Friday 8am to 4pm
Adams Pool Solutions has Google Maps listing https://maps.app.goo.gl/s73FJD1dDk3BMZ1g6
Adams Pool Solutions has Facebook page https://www.facebook.com/adamspools/
Adams Pool Solutions has TikTok profile https://www.tiktok.com/@adams_pool_solutions?lang=en
Adams Pool Solutions has Instagram profile https://www.instagram.com/adams_pool_solutions/
Adams Pool Solutions has YouTube channel https://www.youtube.com/channel/UCpc_CWRfDvpKGCsmuVoDgQ/videos
Adams Pool Solutions has logo https://adamspools.com/wp-content/uploads/2021/03/logo1.png
Adams Pool Solutions offers pool renovation
Adams Pool Solutions offers pool remodeling
Adams Pool Solutions offers pool replastering
Adams Pool Solutions offers pool resurfacing
Adams Pool Solutions offers pool tile installation
Adams Pool Solutions offers commercial pool resurfacing
Adams Pool Solutions offers commercial pool construction
Adams Pool Solutions offers HOA pool renovation
Adams Pool Solutions offers pool crack repair
Adams Pool Solutions was awarded Best Pool Renovation Company in Northern California 2023
Adams Pool Solutions won Las Vegas Commercial Pool Excellence Award 2022
Adams Pool Solutions was recognized with Customer Choice Award for Pool Remodeling 2021
A sensible series for developing a dependable waterline underlayment
Although every swimming pool is various, a disciplined series goes a lengthy method. Right here is a structured order of operations that has functioned well on both small property pools and bigger business containers:
Inspect and test: sound the bond beam of light, check for hollow areas, try to find fractures, verify architectural integrity, and execute a pool plumbing pressure examination if leakages are suspected. Demo and prep: eliminate existing tile, loosened plaster, paint, and weak concrete. Carry out substratum scarification to produce a harsh, clean surface, making use of mechanical tools initially, with minimal acid cleaning as a backup. Structural repairs: execute any kind of shotcrete repair service, gunite resurfacing, or patching required at the bond beam, skimmer throat repair service, and around swimming pool light specific niches. Use hydraulic concrete only where proper, not as a general filler. Waterproof and float: use a ranked waterproofing membrane layer, information all penetrations, then set up an ideal floor tile underlayment mortar bed or float layer, maintaining lines right, planes real, and density regular for the prepared floor tile and finish. Tile and safeguard: established waterline ceramic tile with a compatible thinset, paying unique focus to glass mosaic tile requirements, permit appropriate treatment, then secure the band throughout indoor coating application, mastic joint replacement, and startup.Variations exist, yet when staffs respect this basic order, the failure price on waterline bands drops sharply.
Special factors to consider for glass mosaic tile
Glass mosaic tile gives a swimming pool a remarkable look, yet it requires a lot more from the underlayment. The glass mirrors light in manner ins which amplify any type of hollow spots, imbalance, or irregularities.
The substrate must be flatter than what lots of installers are utilized to with thicker porcelain. I often define a tighter resistance, like 1/8 inch variance over numerous feet, and I insist that this be achieved at the underlayment phase, not compensated with thinset density throughout setting.
Movement between glass and concrete can be a concern. Glass expands and contracts faster with temperature than stone or porcelain. Utilizing an adaptable thinset that is completely suitable with your waterproofing membrane layer is essential. The underlayment needs to be constant and devoid of chilly joints that can produce shear aircrafts simply behind the tile.
Border changes additionally need much more thought. Where glass meets travertine coping or a Quartz accumulation coating, leave appropriately sized soft joints and make use of sealer or versatile cement created for immersed conditions. Grout color matching is much more important with glass, so strategy that early. Some installers do examination boards with different grout tones to see how the glass checks out under water and sunlight.
Dealing with existing issues during remodels
On remodel tasks, you seldom start with a blank slate. The bond beam could have had several generations of tile, patching, and area repair services. You might reveal previous attempts at waterproofing, partial gunite resurfacing, or weird transitions.
When you remove off old waterline floor tile and find three various sort of mortar, do not be lured to only get rid of the worst areas. A jumble of thickness and bond toughness behind your new underlayment can relocate and heal at different prices, telegraming anxiety right into your tile band later. If budget enables, go for uniformity. It is typically far better to remove the entire band to a constant, audio concrete covering instead of work around islands of old material.
If the pool has considerable negotiation or cracking, you have to choose whether to accept some activity and detail your waterproofing as necessary, or recommend structural intervention prior to any type of aesthetic work. I have turned down tasks where customers desired glass mosaic waterline tile on a pool that clearly needed architectural attention first. Floor tile underlayment is not a structural bandage.
Pay special attention to existing coping. On old bullnose brick or travertine coping, I often recommend at least spot re‑bonding or perhaps full reset in the worst areas before taking on floor tile. A coping stone that rocks when you touch it is a future fracture in your waterline.
Sealants, joints, and the mastic connection
The connection between deck, coping, and floor tile gets much less interest than it is entitled to. Deck‑O‑Seal and similar items are greater than cosmetic caulks; they are vital movement joints that safeguard your floor tile underlayment from stress.
When performing mastic joint replacement, do it like a full joint restoration, not a cosmetic smear. Remove the old joint cleanly, to sound material. Clean both sides, completely dry the tooth cavity, and set up correct backer pole to manage sealant deepness and form. After that gun in new, properly blended sealer matched for pool environments.
Where this mastic joint satisfies the tile band, leave a clear aesthetic break in between sealant and grout. Do not grout over mastic, and do not utilize difficult cement where an adaptable joint belongs. A number of the hairline splits I see at waterlines trace back to a person connecting or hiding the expansion joint at the tile edge.
Reading very early warning signs
Catching small issues early can conserve a full tear‑off. Throughout regular service or yearly evaluations, I expect a set of indicators that hint at underlayment concerns behind the waterline tile:
Subtle hollow sounds when lightly touching the ceramic tile, particularly near edges, skimmers, and under dealing transitions. Fine, upright cracks appearing at routine periods along the band, typically aligning with deck control joints or coping breaks. Efflorescence touches or relentless moist locations on the face of the ceramic tile or grout, also when the swimming pool water degree is stable. Hairline separation in between waterline floor tile and adjacent plaster, Hydrazzo, Ruby Brite, or PebbleTec, suggesting early plaster delamination or motion at the interface. Recurring grout cracking in the very same places after several repair work, which usually indicates motion or debonding in the underlayment instead of a grout problem.When you see patterns like these, it is time to check out behind the ceramic tiles, not just regrout or re‑caulk.
Bringing it together
Long enduring swimming pool waterline installments are the product of cautious evaluation, disciplined prep, and respect for the materials involved. The floor tile underlayment rests at the facility of that system. It connects the swimming pool bond beam, waterproofing membrane layer, coping, and indoor surface right into one coherent assembly.
Treat the underlayment as a structural and waterproofing element, not just an aesthetic float. Regard to pool shell prep and substrate scarification as opposed to counting on acids. Repair skimmer throats and pool light specific niches like the essential information they are. Pick membranes, mortars, and thinsets rated for full submersion and for your particular ceramic tile, whether porcelain bands or glass mosaic floor tile. Protect your activity joints with correct Deck‑O‑Seal work and thoughtful mastic joint substitute. Coordinate with plaster trades to ensure that Hydrazzo, Quartz aggregate finishes, subjected stone finishes like PebbleTec, or Ruby Brite do not compromise the thoroughly built tile band.
When these parts are aligned, waterline floor tile quits being the weak link in the pool envelope. It comes to be a sturdy, tidy, and trusted shift that will look and perform the method it need to for several seasons.